Table of Contents
Welcome to Battlefleet, a set of miniature war game rules which recreate one of the most exciting periods in the history of naval conflict. For over a decade beginning in 1895, established and developing nations of the world engaged in a series of wars and naval programs which were to reshape the world's political landscape. The variety of naval designs and doctrines which were put forth at this time resulted in an almost infinite range of possible results, and the ensuing "Pre-Great War" power struggles made for volatile crises which left no nation safe. It was at this time that the navies of two ancient empires; Russia and Spain, were dramatically defeated at the hands of two new industrial powers; Japan and America. Not only did the Spanish-American and Russo-Japanese Wars bring the latest in naval technology to the forefront, but so did numerous other confrontations throughout this period.
Over all this loomed the "super-fleets" of Great Britain and France. The high seas of this time saw "futuristic" French battleships eyeing their British and Italian counterparts, heavily armored American "coastal" battleships maintaining the Monroe Doctrine and the latest British built Japanese fleets shooting it out with the Russians in the West Pacific.
In Battlefleet, many of the possibilities and realities of this time can be recreated, with your abilities having a direct effect on the results.
The computer program Battlefleet is based on the description of the Battlefleet game from the War Times Journal. For now only the small subset of the described game rules is implemented.
Battlefleet is the program for naval conflicts modeling. The program can be used in one of three different modes:
Edit mode to create new battles or to modify initial conditions of existing ones;
Game mode to control the battle;
Film mode to review the battle as film on VCR.
When the Battlefleet program is started the scenario selection window will be opened. This window allows to select the application mode (Edit, Play or Film), and the scenario to work with.
The button in the window displays this help; the button hides the window, and returns to the current scenario (if any) in the current mode without any changes; the button terminates the Battlefleet application.
The application modes are described below.
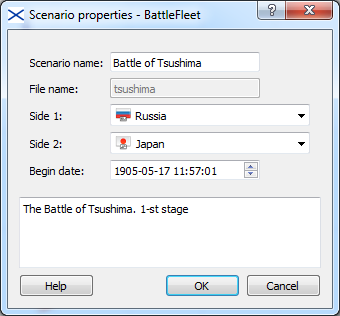
If you plan to create completely new scenario you should select the button and activate the New page. The window similar to shown in the figure New scenario page will be displayed.
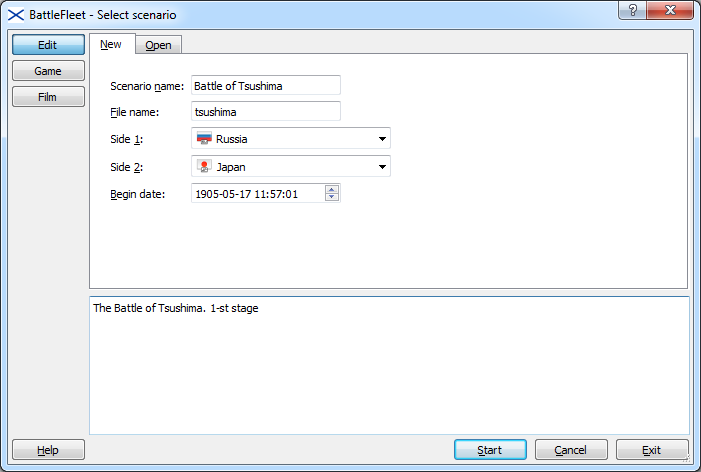
The value entered in the Scenario name field will be displayed in the user interface forms.
The value from the File name field will be
used as the base name for the scenario files in the computer file
system. The new scenarios are saved in the data
subdirectory of the Battlefleet working
directory. On Windows the Battlefleet working directory is located in
user profile (usually
C:/Users/<user_name>), in
AppData/Local/battlefleet sub-directory. On Linux
it is battlefleet directory in user home. Each
scenario save consists of the file with the specified name plus
.xml extension and the corresponding
directory.
Select the enemy names from drop-down list or enter them in Side 1 and Side 2 fields. The vessels of the different sides are indicated with different colors in the map.
Enter the time start point in the Begin date field, brief description of the battle in the bottom text area and press the button. The scenario will be opened in the editor. To modify the scenario later select the Open page in this window - created scenario will be displayed in the list of available scenarios.
If you plan to modify initial conditions of the existing scenario select the button and activate the Open page. The window similar to shown in the figure Open scenario page will be displayed.
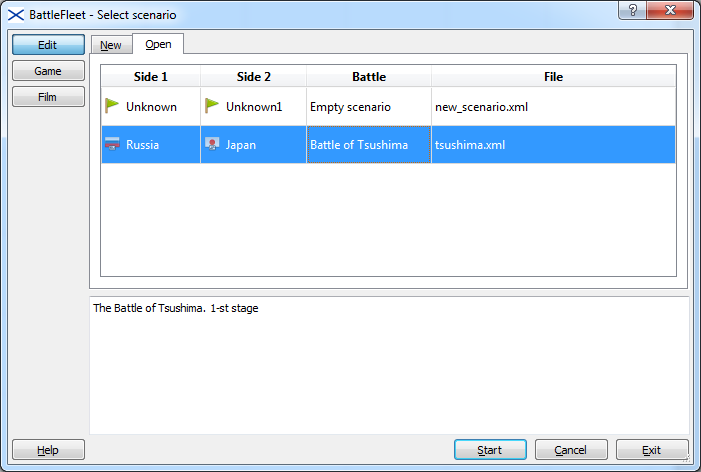
All available scenarios will be displayed in the list. To edit the initial conditions of the scenario select it in the list and press the button. The scenario will be opened in the editor.
In the Battlefleet editor you can specify the initial conditions of the battle:
the map properties;
the list of ships for both sides;
the divisional order;
the beginning time of the battle;
the position, course and speed of each vessel at the beginning time of the battle;
and other scenario properties.
After the initial conditions of the battle have been defined it is possible to start the battle (or play the game, it is up to you). To do this select the button and activate the New page. The window similar to shown in the figure New game page will be displayed.
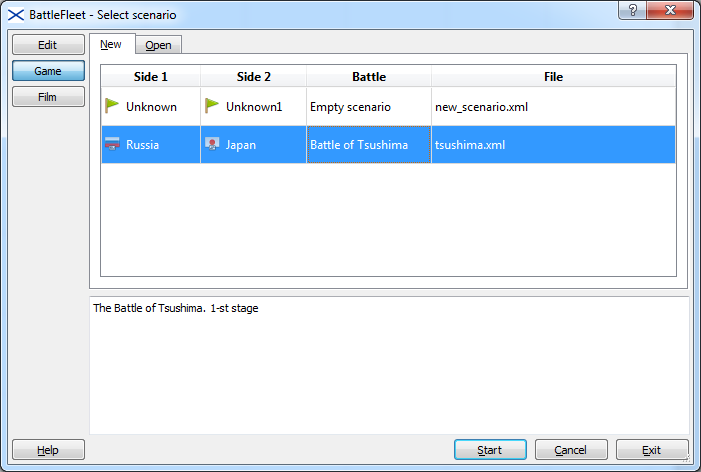
The list of the battles in this page is the same as in the page Open for the Edit mode - you can start to play only scenarios with fully defined initial conditions, the same files were processed to build this list.
To start the game select scenario in the list and press the button. The Battlefleet application will be switched to the Game mode. In this mode you can control speed, course and divisional order of all vessels during the battle.
If the game was terminated or you want to play it in different way you can restart it from the beginning or from the specified time. To do this select the button and activate the Open page. The window similar to shown in the figure Open game page will be displayed.
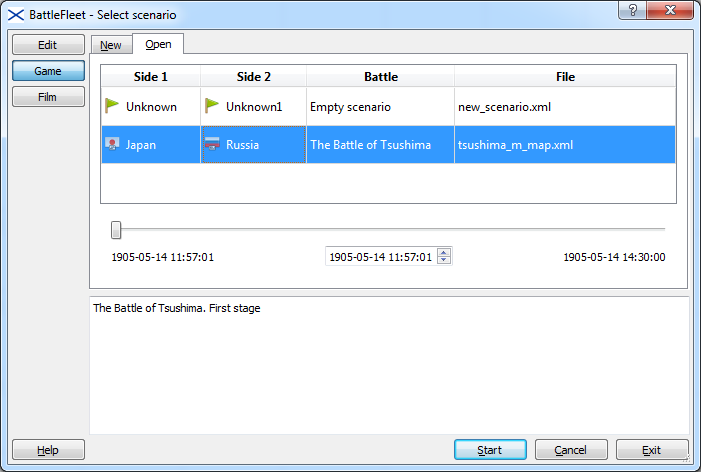
The list of battles in the Open page is different from the list in the New page. The Open page contains scenarios saved in the Game mode. You can start to play the selected scenario from the time between scenario start date and the scenario finish date. The scenario start date is defined in the Edit mode, and the finish date is the last scenario save date.
To replay the scenario select it in the list, set the start date using slider or date entry field and press the button. The scenario will be opened in the Game mode. The scenario state at the specified time will be restored. All commands from the previous save will be replayed, but you can clear future commands for the selected vessel and issue another.
You cannot open scenarios from the list in this page in the editor mode - initial conditions cannot be changed while the battle is in progress.
The Film mode is the simplest in the Battlefleet. In this mode you can only watch the battle, but not control it. To enter the Film mode select button. Only one page will be displayed - the Open page with list of the battles available to be played as the film on VCR. The list of the scenarios is the same as for the Open page in the Game mode. You can start to play as film only already recorded scenarios, the same files were processed to build this list. The window looks very similar to the previous and is not shown.
To play the scenario in the Film mode select it from the list, set the start date and press the button.
In the Edit mode you can do the following:
setup the scenario properties (name, description etc.);
setup the map properties;
add additional ships lists to the ships database (DB). Ships from the ships DB can be used in the scenario;
add ships from the DB into the current scenario;
setup the properties for each ship (position, speed, course etc.);
group ships into the divisions;
setup the battle automatic control properties.
The Battlefleet operates with vessels (ships) and ship divisions (groups). Both ships and groups are called objects.
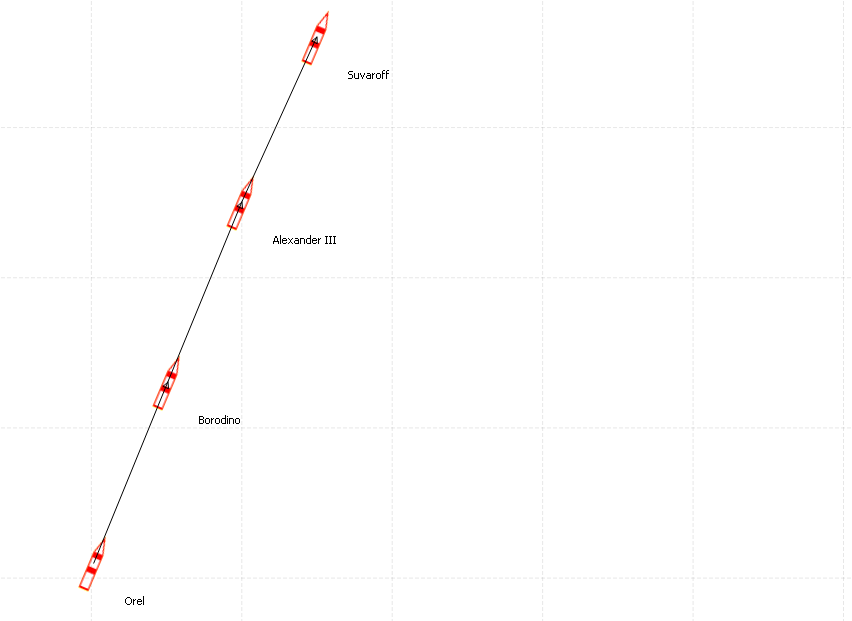
The object can be active or selected. The active object is the receiver of the control commands. Also it is the main object in the selected group. The active object is highlighted with green (Suvaroff in the figure Edit mode in general). Only one object at the same time can be active. The selected object is the member of the selection. Some commands (like grouping) works with the selection. The selected objects are highlighted with cyan.
Below the main areas of the Battlefleet main window are described. After these the Edit mode description is provided.
On the first start the main screen in the Edit mode should be the similar to shown in the figure Edit mode in general. You can lean about the available controls using "What's this?" help mode.
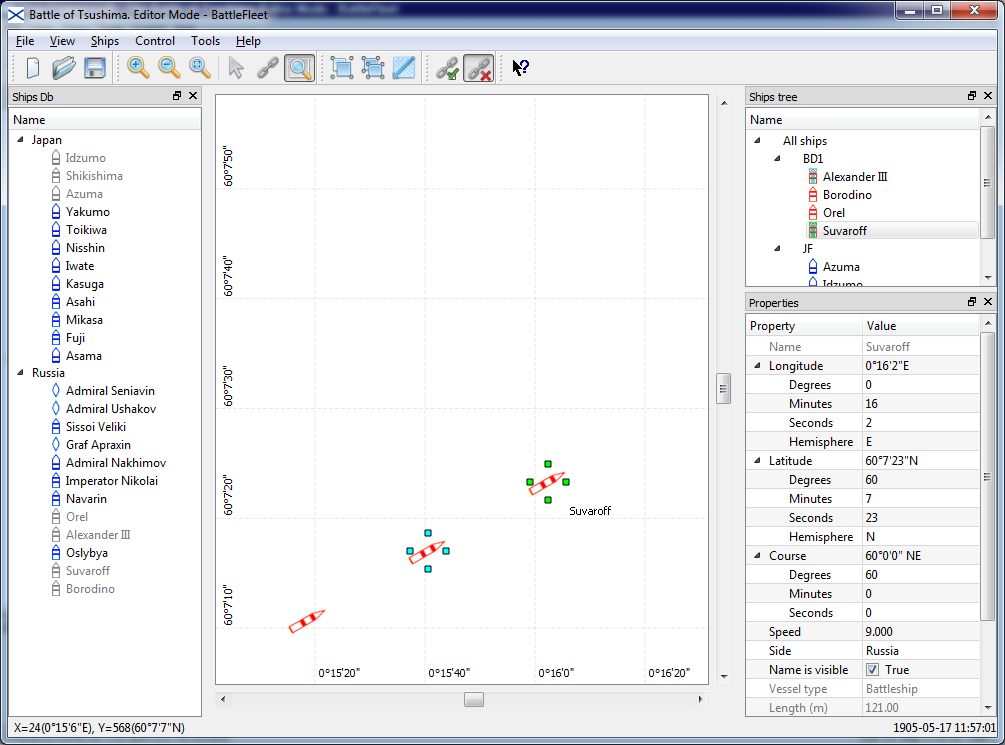
The central area of the Battlefleet window is the battle map. Ships are displayed in this area. Side 1 ships are red, side 2 ships are black, neutral ships are blue. Ships shapes are shown in the table Ship shapes.
Vessel type | Image |
|---|---|
Battleship | |
Armored Cruiser | |
Protected Cruiser, Unprotected Cruiser | |
Destroyer | |
Torpedo Boat | |
Coast Defence Battleship and other | |


The map area can be in three states (by mouse input processing):
Selection
 . In this mode you can select
several ships using mouse. Press the left mouse button and drag
mouse to bound in rectangle all ships to select. Release mouse
button - all ships in bounding rectangle will be selected. The
selection rectangle is green, the scale rectangle is black.
. In this mode you can select
several ships using mouse. Press the left mouse button and drag
mouse to bound in rectangle all ships to select. Release mouse
button - all ships in bounding rectangle will be selected. The
selection rectangle is green, the scale rectangle is black.Connection
 . In this mode you can connect
ships to specify the leader and the followers. Press the left
mouse button on the follower
(pursuer) and move mouse to the
leader (evader). Release
mouse button over the leader. Connection will be created.
. In this mode you can connect
ships to specify the leader and the followers. Press the left
mouse button on the follower
(pursuer) and move mouse to the
leader (evader). Release
mouse button over the leader. Connection will be created.Scale
 . In this mode you can scale the map using
mouse. Press the left mouse button and drag mouse to bound the
area to display. Release mouse button - bounding area will be
displayed. The selection rectangle is green, the scale rectangle
is black. In this mode the mouse cursor has the cross form.
. In this mode you can scale the map using
mouse. Press the left mouse button and drag mouse to bound the
area to display. Release mouse button - bounding area will be
displayed. The selection rectangle is green, the scale rectangle
is black. In this mode the mouse cursor has the cross form.
The state can be changed from the menu or using the corresponding tool bar buttons.
Another way to scale the map also exists. Select commands
 , Zoom out
  or Full view
 from the
menu; or use the corresponding tool bar buttons.
from the
menu; or use the corresponding tool bar buttons.
Connections between ships in the map area can be switched on and off using the menu or the corresponding tool bar buttons. These commands controls only connections visibility, connections will not be added or removed.
To delete ship, group or connection from the scenario select it and press Delete key. Groups and connections will be really deleted, ships will be removed from the scenario and will be enabled in the Ships Database.
The Ships DB window is shown in the left part in the figureEdit mode in general. It displays in the tree view all ships available to use in the scenario. Already used ships are disabled. Enabled ships can be added into the scenario by dropping into the map area. It is possible to select multiply ships using mouse with Shift and Ctrl keys. When the user selects an item in the usual way, the selection is cleared and the new item selected. However, if the user presses the Ctrl key when clicking on an item, the clicked item gets toggled and all other items are left untouched. And if the user presses the Shift key while clicking on an item, all items between the current item and the clicked item get selected or unselected, depending on the state of the clicked item.
Additional ships lists can be added to the Ships DB window. To do this following the instructions:
select item from the menu. File selection dialog will be opened
select the file with additional ships list using the file selection dialog. Additional ships list will be added to the Ships DB window.
The ships list file is a text file, it can be created by the user. The procedure is described in the Additional Information of this manual.
The Ships Tree window is shown in the upper right part in the figure Edit mode in general. This window provides the way to group ships into the divisions and to select ships and groups. You can drag'n'drop selected objects in this window.
Use Shift and Ctrl keys to
control the objects selection. Use the
 item from the menu to
group the selected objects in one division. New group will be created
at the top level. Drag it using the mouse and drop it on the target
group.
item from the menu to
group the selected objects in one division. New group will be created
at the top level. Drag it using the mouse and drop it on the target
group.
Use the Ungroup  item from the
menu to ungroup the selected objects. Use
Delete key to remove the selected objects.
item from the
menu to ungroup the selected objects. Use
Delete key to remove the selected objects.
The Properties window is shown in the bottom right part in the figure Edit mode in general. The active object properties are displayed in this window. If no active object exists the map properties are displayed. The "What's this?" help is available for each property in the window. The property may be enabled for changes or disabled - it depends on the context.
Initially the scenario properties are defined in the scenario selection window, in the New page for the Edit mode (see New scenario page). But the scenario properties can be changed later. To change properties do the following:
select the item from the menu. The Scenario Properties window will be displayed. The example of the window is shown in the figure Scenario properties;
modify the values in the entry fields;
press the button to apply changes, or press the button to close window without changes.
The value entered in the Scenario name field will be displayed in user interface forms.
The value from the File name field will be used as the base name for the scenario files in the computer file system. This value can not be changed in the Scenario Properties window and is provided for information only. To save the scenario in the files with different base name select the item from the menu.
Select the enemy names from drop-down list or enter them in Side 1 and Side 2 fields. The vessels of the different sides are indicated with different colors in the map.
Enter the time start point in the Begin date field, brief description of the battle in the bottom text area.
To setup the map properties make sure that the Properties window is visible. If not call the right mouse button menu in the application menu bar and select the item.
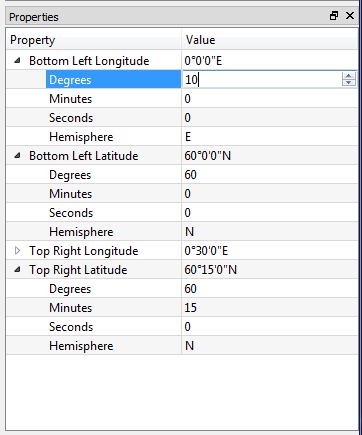
Click on the empty area in the map to clear the selection for all objects. The following map properties will be displayed:
Bottom left longitude. The longitude of the bottom left map point.
Bottom left latitude. The latitude of the bottom left map point.
Top right longitude. The longitude of the top right map point.
Top right latitude. The latitude of the top right map point.
The map will be scaled using the bottom left corner coordinates and top right corner coordinates, and may be extended to fit the map area geometry.
Example of the map properties is shown in the figure Map properties.
To add ships into the scenario make sure that the Ships DB window is visible. If not call the right mouse button menu in the application menu bar and select the item.
In the Ships DB window (see Ships DB) select ships to add. It is possible to select multiply ships using mouse with Shift and Ctrl keys. If the ship selection is disabled then the ship is already used in the scenario. Drag selection and drop it in the map area or in the Ships Tree window (see Ships Tree).
To remove the ship from the scenario select it in the map area or in the Ships Tree window and press Delete key.
To setup and check the ship properties make sure that the Properties window is visible. If not call the right mouse button menu in the application menu bar and select the item.
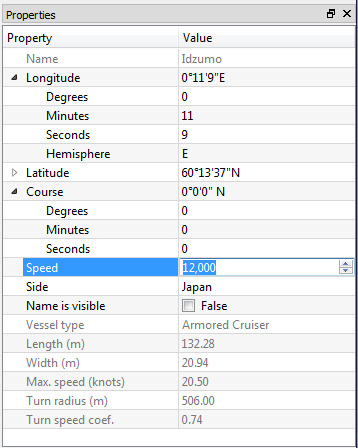
Make active the target ship. The ship properties will be displayed in the Properties window (see Properties Window). The following properties are editable:
Longitude and latitude. It is possible to enter the longitude and latitude directly in the properties window, but it is not the simplest way. You can drag the ship using the mouse and position it in the map. Zoom-in the map view for precision movement.
Course. The course value can be changed from 0 degrees (N) to 359 degrees 59 minutes 59 seconds clockwise.
Speed. The speed should be entered in knots. Speed limits will be checked.
Side. The current side is indicated by the color (side 1 is red, side 2 is black, neutral is blue).
Name visibility.
The help is available for each property. Example of the ship properties is shown in the figure Ship properties.
The common task is to deploy division in line-ahead. To do this make the following:
set the precision position of the flagship;
set the course and the speed of the flagship;
order other ships behind the flagship in the required order but without precision position calculation;
select all ships in the division (using the Selection state of sea map view and mouse, or using the mouse with Ctrl or Shift keys);
set the flagship to be the active ship (click on it by mouse holding the Ctrl key, maybe twice);
select the Order
 item from the
menu or use the corresponding tool bar
button.
item from the
menu or use the corresponding tool bar
button.
As the result the ships will be ordered in line-ahead. The interval between ships depends on the flagship speed. Also the connections between ships will be created - it may help to control the division in battle, see details in the Setup Battle Automation.
Grouping ships into the divisions can be done in several ways. The simplest way is to select the ships for the future division and to apply the command from the menu (or to press the corresponding tool bar button). New group with the default name will be created at the top level of the Ships Tree. To finish the work do the following:
select the newly created group in the Ships Tree window. Properties for the group will be shown in the Properties window
change the Name property of the group
change the Side property of the group to set selected side for all group members if required
in the Ships Tree window drag the group using mouse and drop it on the target group in the same window
Another way is to create empty group at first, then add objects in it. To create empty group apply the command when no objects are selected.
To remove the group from the scenario select it and press Delete key.
Very often it is necessary to implement the "follow me!" behavior for the ships in division: all division members repeat the maneuver of the flagship in the succession manner (not simultaneously). It is hard to send commands for each ship in division; it is possible to send only one command to the division; but the most convenient way to do this is to transfer to the computer control over all ships in the division except the flagship. This can be done using so called chasing connections. The computer considers the ships pair as pursuer and evader, and controls the pursuer to tail along.
To create the "pursuer-evader" pair do the following:
switch the sea map to the Scale state using the item from the menu or the corresponding tool bar button;
scale the map view to display both pursuer and evader;
switch the sea map to the Connection state using the item from the menu or the corresponding tool bar button;
press the left mouse button on the follower (pursuer) and move mouse to the leader (evader). Release mouse button over the leader. Connection will be created.
The connections are created automatically when the
command from the
menu is applied. The connections visibility may
be controlled using the Show chasing connections
 and the
  commands from the
menu.
commands from the
menu.
To remove the connection do the following:
apply the command from the menu;
clear selection from all objects by mouse click in empty area in the map (because all the selected objects will be deleted);
select the connection to delete;
press Delete key.
More details about usage of the chasing connections see in the Game Mode. The example of the chasing connection is shown in the figure Chasing connections.
To save the scenario select the item from the menu.
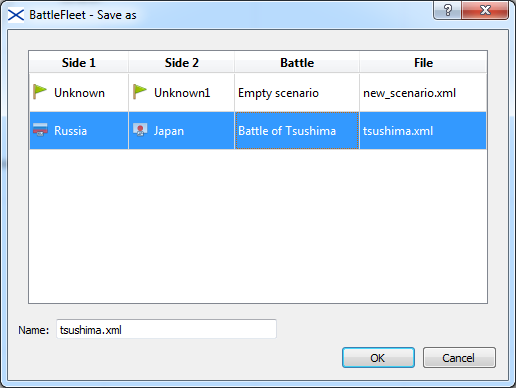
To save the scenario with the different name select the item from the menu. The window will be opened (see "Save as" window). Select the scenario from the list to overwrite or enter new name in the Name input line.
In the Game mode you can do the following:
pause and restart the battle;
change the time speed;
group ships into divisions;
change the ship or division side;
send commands to the ships and divisions to change the course and speed;
add messages that should be displayed on the screen at the specified moment of the battle;
set map region to be displayed on the screen at the specified moment of the battle;
edit scheduled battle events;
switch between computer and manual control over the ships.
Below the main areas of the Battlefleet main window are described. After these the Game mode description is provided.
On the first start the main screen in the Game mode should be the similar to shown in the figure Game mode in general.
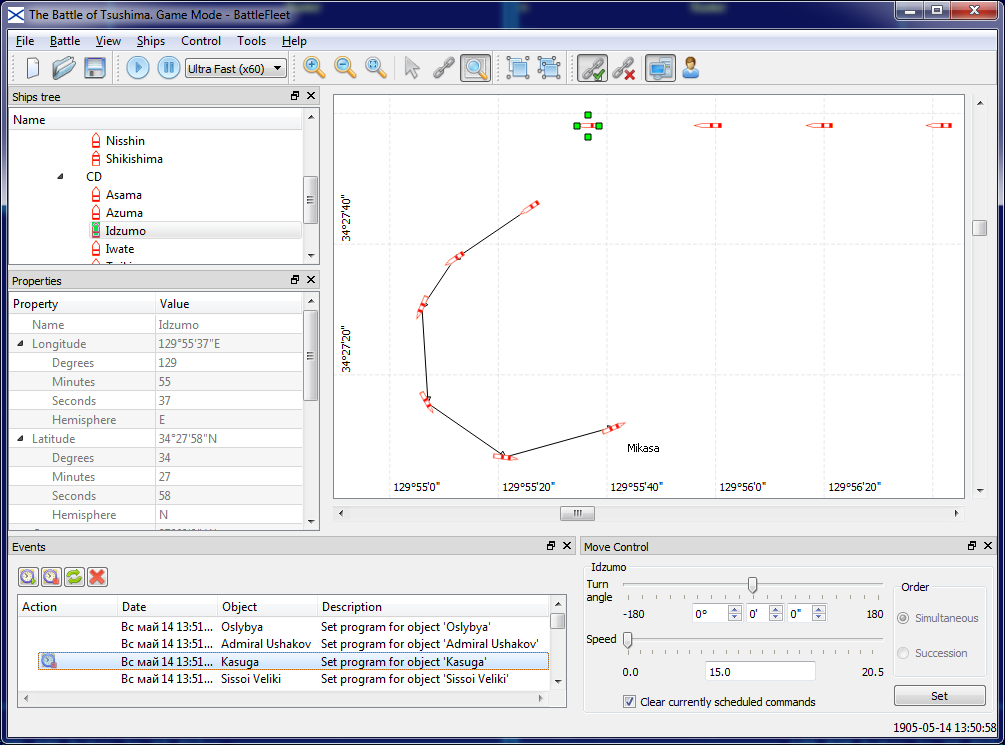
The window is very similar to the main window in the Edit mode. So, refer to the Environment overview in the Edit mode section for the window description; only differences will be mentioned here.
The main difference is that the Ships DB window is not available in the Game mode. So, it is not possible to add or delete ships from the scenario during the battle.
Also it is not possible to move ship from one location to another using mouse. To move ship you should send control commands to it about course and speed.
In the Properties Window the Longitude, Latitude, Speed and Course properties are now read-only for the same reason.
In the Game mode in contrast to the Edit mode the time is not constant. To control the battle state (paused or running) and time speed use the menu commands or the corresponding tool bar buttons. The current time is shown in the bottom right corner of the main window. Also it is possible to display current time on the map area (use item from menu).
It is possible to send commands to the active ship in the map view using the keyboard arrow keys:
left arrow - turn to the left;
right arrow - turn to the right;
forward arrow - speed up;
back arrow - speed down.
The arrow keys can be used in combination to turn and change speed. But the main control tool is the Move Control window.
The completely new Move Control Window is described in details below.
The main object (ship or division) control tool is the Move Control window. It can be used to send different commands to the active object:
command to change speed;
command to change course;
command to change speed and course.
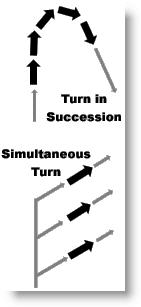
If a division commander wants his ships to move in any direction other than straight he must order them to do so. The available divisions orders are:
turn-in-succession. Only divisions deployed in line-ahead may use the turn-in-succession order. Ships turning in succession will maintain their line ahead formation while turning on a stationary pivot-point. The Turn-in-Succession part of the Turn types figure depicts a 90°+ turn in succession to starboard as executed by ships in a line-ahead formation;
simultaneous turn. Each vessel in a division ordered to turn simultaneously will individually turn in unison in the direction ordered. Vessels not in line ahead formation will always use the simultaneous turn command. If a turn-in-succession order is accidentally given to vessels not in line ahead, the command will be treated as if it were a simultaneous turn order. Note that if a division is in line abreast, only certain simultaneous turn commands will allow a return to line ahead.
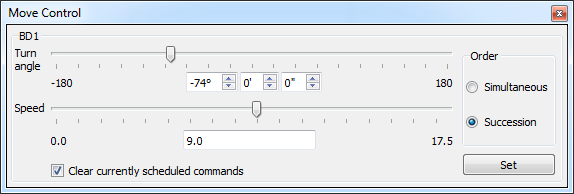
The Move Control window examples are shown in the figure Move Control for the ship for the single ship and in the figure Move Control for the division for the division in line-ahead. The division order type selection is available in the last figure.
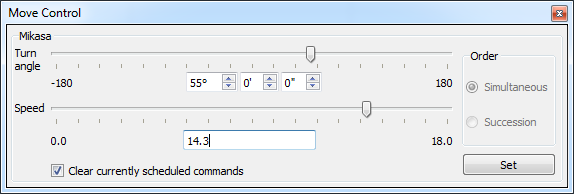
The Move Control window contains the following areas:
Active object name. It is displayed in the panel caption(Mikasa, BD1 on the figures).
Turn angle. It consists of the slider and input field. Attention: this is the angle to turn, not the final course. Negative values of the turn angle means turn to the left (to port), positive - to the right (to starboard). If you need to turn more then 180 degrees then send two turn commands.
Speed. It consists of the slider and input field. The speed is entered in knots. The bottom limit is 0, the top limit is the Max. speed property value (see the Ship Properties Setup). For the ships group the maximum available speed is the lowest speed value of the ships in group. The negative speed cannot be entered using the Move Control window, but it is possible to move with negative speed using the keyboard arrow keys.
Order. For the single ship this area is disabled - standalone ship always turns simultaneous. For the division in line-ahead formation the turn order may be selected.
Clear currently scheduled commands option is useful when you want to make minor changes in already recorded scenario. Detailed description see below.
button. Press this button to send commands.
The scenario consists of the command sequence. If you want to change the maneuver of one ship in the middle of the battle, but do not want to replay all the battle, the Clear currently scheduled commands option may be useful. To make changes do the following:
start the Battlefleet application;
in the Select Scenario window select the button and activate the Open page (see Open game page);
select scenario to modify in the list;
select the start time when the first modification is required;
press the button to load the scenario at the specified time;
send commands to the target object. If the Clear currently scheduled commands option is not checked new commands will be added without removing existing commands scheduled in future; otherwise all commands for the active object will be removed and you will need to replay battle to the finish time for the active object only.
When the scenario has been loaded the battle is paused. To start
battle select the Play  item from the
menu or press the corresponding tool bar
button. The battle time (in the bottom right corner of the main window)
begins to change and the ships begins to move. To pause the battle
select the Pause
item from the
menu or press the corresponding tool bar
button. The battle time (in the bottom right corner of the main window)
begins to change and the ships begins to move. To pause the battle
select the Pause  item from the
menu or press the corresponding tool bar
button.
item from the
menu or press the corresponding tool bar
button.
The battle time speed can be controlled. The following speed levels are available:
Real time. No time speed acceleration.
Slow (x2). The battle speed is 2 times faster then real time
Normal (x10). The battle speed is 10 times faster then real time. 10 battle seconds in 1 real time second.
Fast (x30). The battle speed is 30 times faster then real time. 30 battle seconds in 1 real time second.
Ultra fast (x60). The battle speed is 60 times faster then real time. 60 battle seconds in 1 real time second.
To change the battle time speed select the target speed from the menu or from the drop-down list in the tool bar. The selection takes effect immediately but to see the result the battle should be running (not paused).
Note, that time speed acceleration depends on the computer power and the battle complexity: the real speed may be slower then promised.
Grouping ships into the divisions is the same as in Edit mode, but when the group is deleted ships from it will be moved to the top level of the Ships Tree. See Group Ships Into Divisions.
To setup and check the object side make sure that the Properties Window is visible. If not call the right mouse button menu in the application menu bar and select the item.
Make active the target object. The object properties will be displayed in the Properties window. Select the appropriate side from the drop-down list in the Side property.
To send the command to the active ship you can go the following ways:
control ship with the arrow keys, see Environment Overview;
control ship or group in the Move Control window, see Move Control Window.
Some notes about speed in turn are required. The model recreates a vessel's loss of speed while turning, the actual speed in turn is always less then the shown one. This is planned, and not a problem. The Turn speed coef. property shows the loss of speed coefficient.
If the ship was under the automatic (computer) control the user command switches it to the manual control state.
If one ship should follow the another ship during the long time then the "pursuer-evader" pair may be created and computer will control the pursuer. How to create the pair is described in the Setup Battle Automation in the Edit mode section.
Connection can be active (displayed with black) or inactive (displayed with gray). Inactive connection does nothing. Active connection stimulates computer to send commands to pursuer to go to the leader. To change the individual connection state use right mouse button menu.
The connections are saved when the battle is saved, and restored
when the battle is loaded, but all in the inactive mode. The connections
should be activated manually. To activate all connections select the
Computer controls ships  item from the menu. To deactivate all connections select the
 item from the menu.
The correspondent tool bar buttons also may be used.
item from the menu.
The correspondent tool bar buttons also may be used.
Do not confuse the connection state (active or inactive) with connection visibility (visible or not). To control the connections visibility use the and the commands from the menu.
To change state for more then one connections do the following:
show chasing connections using the command from the menu;
switch the map view to the Select state using the command from the menu;
select with mouse connections to be changed. Ships also may be selected - they are ignored;
move mouse cursor over the connection and call the right button menu;
change the connection state from the menu.
You can select the connection not only in the Select map view state but in any state by mouse click on it. Press Delete key to remove the selected connections.
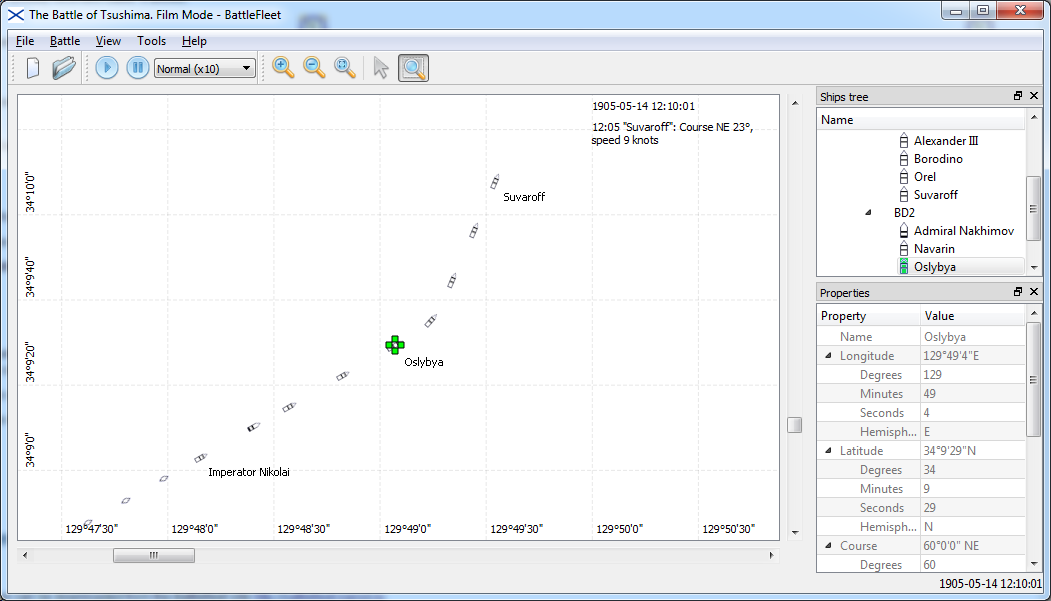
It is possible to add messages that should be displayed on the screen at the specified moment of the battle. Do the following to display the message:
make sure that the display of messages is enabled. Select item from menu, check Show messages in Display options group, press OK button (see figure Options);
run battle to the time when message should be displayed;
pause the battle;
select from menu;
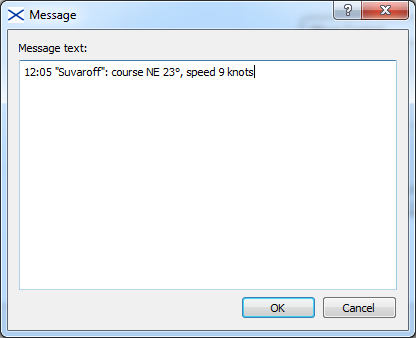
enter the message text in the displayed dialog. Keep text empty to clear the message. press OK (see figure Message);
run the battle;
message will be displayed on map area (see figure Message in the map).
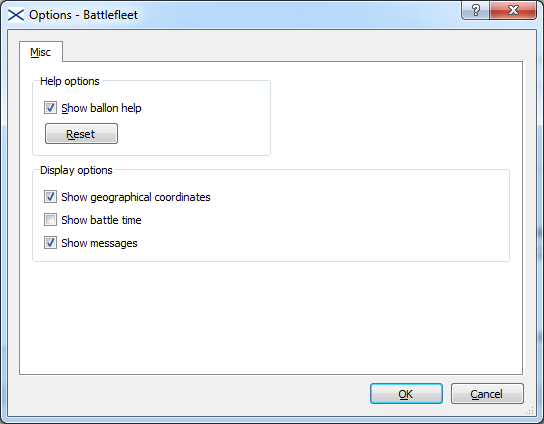

The current battle time is always displayed in the bottom right corner of the application window. It is possible to display the current battle time also in the map. Just enable Show battle time option in Options dialog (see figure Options).
Display of messages and battle time may be useful to play battle as a film in the future.
It is possible to set map region to be displayed on the screen at the specified moment of the battle. Do the following to set the map region:
run battle to the time when map region should be displayed;
pause the battle;
scale the map to the required region using zoom commands from menu or by mouse in Scale
mode;select from menu;
run the battle.
On next run the saved scale will be automatically set when battle time reaches the same value.
Scaling of the map may be useful to play battle as a film in the future.
It is possible to control visibility of ship name. Set Name is visible property of the active ship in the Properties window to the appropriate value (see Message in the map where the "Suvaroff" name is visible). Name visibility commands are saved in the scenario and re-played when the battle is played next time.
Control over name visibility may be useful to play battle as a film in the future.
Battle scenario consists of the sequence of events that are recorded in the scenario file.
Example of events:
show message in the map;
scale map;
show/hide ship name;
set program (schedule of course and speed changes) to ship or division;
etc.
Each event has the date when it should be executed. Full list of events is displayed in Events window (see figure Events List).
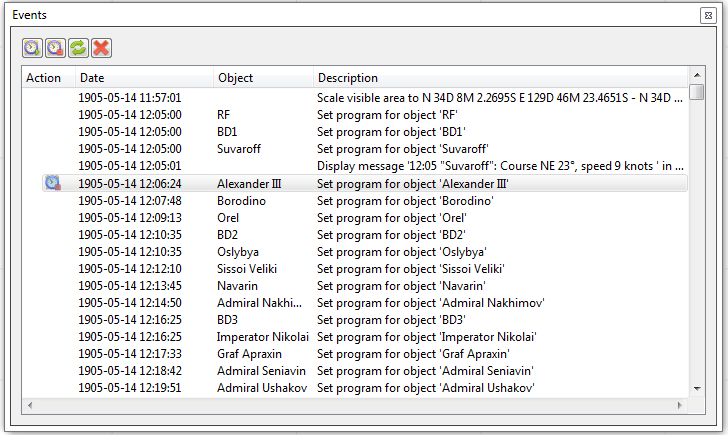
Usually this window is used to fine-tuning of already recorded battle. It allows:
stop battle just before the specified event. Select the required event in the list and press Ask
 button on Events
window toolbar (see figure Events List for Alexander
||| object). To clear the mark press
Execute
button on Events
window toolbar (see figure Events List for Alexander
||| object). To clear the mark press
Execute  button on Events
window toolbar;
button on Events
window toolbar;remove the event. Select the required event in the list and press Remove
 button on Events
window toolbar. Event will be removed from the list and will not
be executed;
button on Events
window toolbar. Event will be removed from the list and will not
be executed;refresh the list of events. For paused battle the list may not reflect the newly created events (usually message and scale events). Press button Refresh
 button on Events
window toolbar to refresh the list. It may take some time to
perform this operation.
button on Events
window toolbar to refresh the list. It may take some time to
perform this operation.
To save the scenario select the item from the menu.
To save the scenario with the different name select the item from the menu. The Save as window will be opened. Select the scenario from the list to overwrite or enter new name in the Name input line.
It takes time to save huge scenario, and battle is paused during this time.
The Film mode is used to replay the battle without any chance to change it. It is the same as the Game mode but the ships control is disabled. Battle pause, restart and time speed control are available. Also you cannot save the scenario in the Film mode, no connections control available.
This mode can be used to play the scenario created by someone other.
On the first start the main screen in the Film mode should be the similar to shown in the Film mode in general.
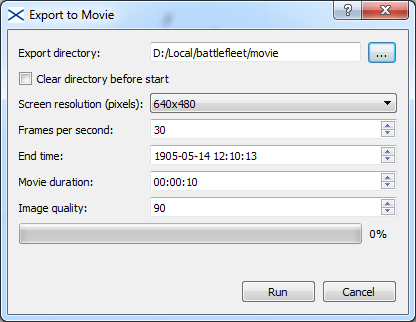
It is possible to export scenario to movie. Movie itself will not
be generated, but the sequence of pictures will be created. It is simple
to convert sequence of pictures to the movie using tools like
ffmpeg.
To generate sequence of pictures do the following:
select from menu. The Export to Movie dialog will be displayed (see figure Export to Movie);
specify the settings in the window. Use What's this button in the window header to get more information;
press Run button.
As a result the sequence of images in PNG format will be generated in the specified directory. Name of the image contains date and time of the battle. All messages, map scale events, ship name visibility changes will be reflacted on images. It is useful to display current battle time in the map area (enable Show battle time option in Options dialog, see figure Options).
The source code of the Battlefleet application can be downloaded from https://sourceforge.net/projects/battlefleet2/
Ships List file is the text file. It can be designed in any text editor. The file is in xml format. The file is case sensitive. The file contains the following elements:
<?xml version="1.0" encoding="latin1 | UTF-8 | windows-1251 | any other standard encoding"?>
<Ships Name="Unique name in file">
Element
...
</Ships>
The Element can be the Ships element with the shown above structure and the Ship element. The Ship element format is the following:
<Ship Name="Unique name in file"
VesselType="Battleship | CoastDefenseBattleship |ArmoredCruiser |
    ProtectedCruiser | UnprotectedCruiser | GunBoat | Destroyer|TorpedoBoat"
Size="Integer Number"
Length="Length in meters"
Width="Width in meters"
Speed="Speed in knots with . as a decimal separator"
TurnRadius="Turn radius in miles with . as a decimal separator">
</Ship>
The Name attribute should be unique in the file (for all Ship and Ships elements) and in the scenario where this file is used.
The Size attribute is the War Times Journal Battlefleet game abstraction. It can be calculated as normal displacement multiplied by .004. Values of larger vessels (over 25) are rounded, usually to nearest 5. If the attribute is not specified then the default value for the ships type will be used. See the table Ship size defaults.
Ship type | Default size |
|---|---|
Battleship | 50 |
CoastDefenseBattleship | 15 |
ArmoredCruiser | 35 |
ProtectedCruiser | 15 |
UnprotectedCruiser | 5 |
GunBoat | 5 |
Destroyer | 1 |
TorpedoBoat | 1 |
If the Length attribute is omitted then the default value 100 meters will be used.
If the Width attribute is omitted then the default value 20 meters will be used.
If the TurnRadius is omitted then the default value for the ships type will be used. See the table Turn radius defaults.
Custom ships list may be added to the battle in
Edit mode using item from menu. Example
of file is available in the common subdirectory of
the Battlefleet working directory. On Windows
the Battlefleet working directory is located in user profile (usually
C:/Users/<user_name>), in
AppData/Local/battlefleet sub-directory. On Linux
it is battlefleet directory in user home.
Use Log window to see error messages if something is wrong when custom ships file is loaded.
Currently only Russian and Japan flags are displayed in the
drop-down lists of the Select scenario dialog. It
is possible to extend the list of flags by editing the
flags.xml from common subdirectory of the
Battlefleet working directory. On Windows the
Battlefleet working directory is located in user profile (usually
C:/Users/<user_name>), in
AppData/Local/battlefleet sub-directory. On Linux
it is battlefleet directory in user home.
Example of flags.xml is shown
below:
<Flags>
  <Flag name="Russia" image="flag_russia.png"/>
  <Flag name="Japan" image="flag_japan.png"/>
</Flags>
Also images for new countries should be stored in the same
directory as flags.xml. Use
Log window to see error messages if something is
wrong.
Battle may be localized. Localization is performed using special file. File format is the following:
<?xml version='1.0' encoding='UTF-8'?>
<Items>
  <Item l="Localized text" o="Original text"/>
  ...
</Items>
Battle files are stored in data or
save sub-directories of
Battlefleet working directory. On Windows the
Battlefleet working directory is located in user profile (usually
C:/Users/<user_name>), in
AppData/Local/battlefleet sub-directory. On Linux
it is battlefleet directory in user home. Battle
files includes:
main battle file (for example,
tsushima_m_map.xml);sub-directory with the same name as main battle file without extention (
tsushima_m_mapin our example).
Localization file should be stored in the battle sub-directory
(tsushima_m_map in our example). The name of the
file should be:
<battle_name>_localizer_<locale>.xml
<locale> should be 2-characters string
(ru, de,
fr, ua, au
etc.).
In our example file for Russian locale (ru)
will be tsushima_m_map_localizer_ru.xml.
Localization file should be created manually. Initial content of the file should be the following:
<?xml version='1.0' encoding='UTF-8'?>
<Items>
</Items>
After that the specified locale should be set on the computer and
battle should be played from the begin till the end. File will be
automatically updated with all strings that should be localized. Now
file should be translated and localized text should be entered into
l attribute value.
Game may be re-played, and all strings now should be displayed as localized text. Use Log window to see error messages if something is wrong.
Please, report the bugs and feature requests to mailto:balabay.oleksiy@gmail.com with the "Battlefleet" in the subject.